728x90
내가 하고 싶었던 것은
http:~ 로 된 주소에 담긴 API data 를
내가 구현한 서버에서 제공하는 거 였음.
고로 내가 구현한 서버에서 프록시 서버의 역할을 해주어야 하는 것.
이때 뭐 RestTemplete 이니 WebClient 니 설치하고 셋팅하고... 너무 귀찮았음.
그래서 간단 ver 로 requestUtil 을 만들어보았다.
import org.springframework.http.HttpEntity;
import org.springframework.http.HttpHeaders;
import org.springframework.http.HttpMethod;
import org.springframework.http.ResponseEntity;
import org.springframework.util.MultiValueMap;
import org.springframework.web.client.RestTemplate;

public class RequestUtil {
	public static String restRequest(String requestUrl){
		String result="";

		//보낼 파라메터 셋팅
//		MultiValueMap<String, String> params = new LinkedMultiValueMap<>();
//		params.add("id", id);

		//헤더셋팅
		HttpHeaders headers = new HttpHeaders();
		headers.add("헤더이름", "application/json; charset=utf-8");
		//Mozilla/5.0 (Windows NT 10.0; Win64; x64) AppleWebKit/537.36 (KHTML, like Gecko) Chrome/121.0.0.0 Safari/537.36

		//파라메터와 헤어 합치기
//		HttpEntity<MultiValueMap<String, String>> entity = new HttpEntity<>(params, headers);
		HttpEntity<MultiValueMap<String, String>> entity = new HttpEntity<>(headers);
		//RestTemplate 초기화
		RestTemplate rt = new RestTemplate();

		//전송 및 결과 처리
		ResponseEntity<String> response = rt.exchange(
				requestUrl,
				HttpMethod.GET,
				entity,
				String.class
		);
		result = response.getBody();//리턴되는 결과의 body를 저장.

		return result;
	}

}
그리고 사용하기를 원하는 시점에서 다른 Util들 꺼내쓰듯이 꺼내어서 넣어주면 됨.
RequestUtil.restRequest("HTTP://~");
이렇게 해서 dsResult 에 넣어서 프론트에서 받아주면
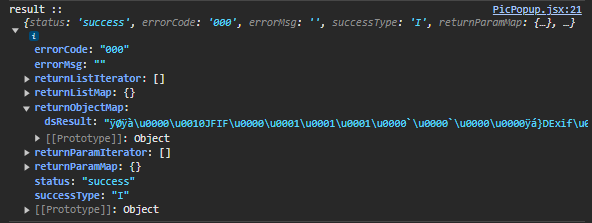
위와 같은 형태로 return 됨.
본인의 경우 기존 http://~ 주소에 이미지가 담겨 있어서 위와 같은 형태로 뜨고..
아마 json 형태로 어떤 값이 들어있었다면, 그대로 담고 있는 형태일 것 이다.
잘 붙혀 넣어서 쉽게 사용해보시길...
728x90
